TZXDuino is a cool Arduino project that is basically a standalone hardware cassette audio playback unit for old computers. You hook up an Arduino, a microSD card adapter, an I2C LCD display and 5 buttons. Load a microSD with lots of game dumps, and hook that up to the audio input of your ZX Spectrum or Amstrad. With the buttons and LCD you can scroll through the files on the SD and basically ‘hit Play’. So it can play the most common ZX Spectrum tape dump formats ; TZX and TAP (plus a few for the ZX80 and ZX81), and CDT format (for the Amstrad) as it’s basically the same as TZX.
It can’t play UEF tape dumps though. UEF is the tape dump format used by the BBC Micro and Acorn Electron. My current way of loading UEF files on my Electron is to use freeuef-alsa on a linux PC with its audio out hooked up the Electron. Every time the Electron pauses the cassette I have to hit space on the PC, then wait a bit and press Enter to get it going again. It is not ideal.
So basically I’ve been hacking away at the TZXDuino code to add in UEF support. There are a few caveats at the moment
- It can’t handle gzipped UEF files. Most UEF files you download from the internet have been gzipped (even though there is no .gz extension). All you need to do is gunzip a UEF and rename it so that it still ends in .uef before you put it on the microSD. On Mac/linux you would do something like this to convert a file:
gunzip -c game.uef >game.uef.tmp && mv game.uef.tmp game.uef
- TZXDuino outputs square wave tape audio. Most documentation for the Electron say you need a nice sine wave … but I thought it might not matter that much … and indeed that’s what I’ve found. The Electron does not care that its getting a square wave. If I was really keen I would figure out some set of resistors and capacitors on the Arduino audio output to convert the square wave into something a bit more like a sine wave.
- There are heaps of ‘chunk IDs’ that are documented in the UEF format definition. I think I only understand about 3 or 4 of these chunks. This seems to be enough for most games so far.
So if you don’t mind gunzipping all your UEF files (which is a pretty simple script on a linux/Mac system), then it works pretty well.
Putting it together
Here’s my test setup on a breadboard
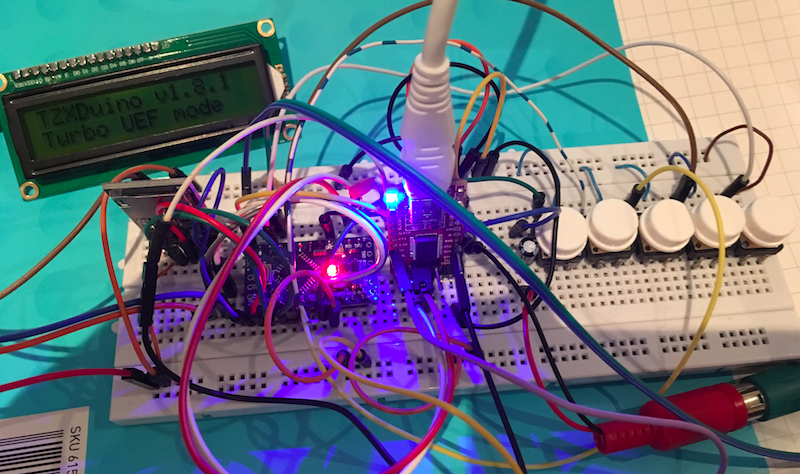 You can use an Arduino Uno, but I used an Arduino Mini and have an FTDI adapter sticking up to simplify programming it (which I won’t need when I solder it all together). Wiring is on the TZXDuino page. They talk about using a small amplifier from the output on D9, but I thought the Arduino itself can probably drive a headphone at least and that might be enough. So I just have this resistor/capacitor setup with a 200R variable trimpot to control the volume.
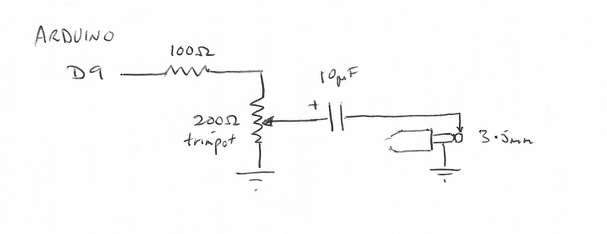
Generally, once I’ve found the ‘sweet spot’, I never adjust the volume ever again. For reference if the trimpot split is 40 ohms (on the arduino side) and 160 ohms (on the ground side), it seems to work pretty well for me.
A huge plus with TZXDuino is that D6 can be used for motor control. The Electron has two pins on its cassette interface for motor control. They just go to either side of a relay. Just tie one to ground. And the other goes to D6. Now when a cassette loader needs to pause playpack, TZXDuino will pause (and you will see it in the LCD display).
Enhancements
As I recently added in some speed enhancements to freeuef-alsa, I’ve done much the same on TZXDuino (for UEF). These are discussed in a few stardot forum posts ; here and here. I find even with square wave output, I can make it do 1550baud OK. Some games can be a bit fickle if I reduce the carrier tone lengths. First the .h file contains settings for normal 1200 baud playback:
// 1200 baud UEF
#define UEFPILOTPULSES outWord<<2;
#define UEFPILOTLENGTH 208
#define UEFZEROPULSE   416
#define UEFONEPULSE    208
And additional settings for turbo mode:
#define UEFTURBOPILOTPULSES 320
#define UEFTURBOPILOTLENGTH 161
#define UEFTURBOZEROPULSE   322
#define UEFTURBOONEPULSE    161
Essentially the pulse lengths are in microseconds. For example a 1200Hz wave used for a 1200 baud zero has a cycle time of 1/1200 = 833us . Divide that by two and you get 416-ish which becomes the UEFZEROPULSE setting. Similarly 2400Hz is used for a logical one. 1/2400 = 416us. Divide that by two and you get 208us which becomes the UEFONEPULSE and UEFPILOTLENGTH.
If you hold the ROOT key down when you power on, you should see ‘Turbo UEF mode’ flash up. Now when you play UEF files, they should use the turbo settings. It is not a lot faster, but definitely you can save a minute or two of load time. If you want it to default to Turbo UEF mode (and use the ‘hold down ROOT at switch on to put it back to 1200 baud) then change the uefTurboMode variable in the .h file to be 1:
byte uefTurboMode=1;
Using it
Just use +/- to scroll through a directory. To play you hit play. If you hit play again it pauses. If you hit stop it stops. If you are +/- ing and you want to enter a directory you hit play (ie. it acts like an ENTER key). The root button takes you back to the root (ie. there isn’t really a ‘parent’ button)
If you have the BBC/Electron motor relay hooked up to the Arduino, the audio playback will pause and start playing again automatically. Otherwise, you’ll need to wait for a click of the relay, press Play to pause the playback, then when the Electron says ‘Searching’, you press Play again to continue playback.
Below I’ve soldered all the pieces onto a protoboard. The blue trimpot is my volume control. The 5 pin header goes to an FTDI usb-serial adapter if I need to reprogram the Arduino mini. Then I have a USB connector as a simple means of feeding in +5V from somewhere. The jack on the middle left goes to the Electron motor control. The jack in the lower left is the audio out. The buttons are (P)lay, (S)top, (R)oot, – and +

Source
TZXDuino-with-uef-1.8u1.tar.gz
Note: I have tested this mainly on my Acorn Electron. For whatever reasons, the cassette interface of my BBC Micro seems to be broken (I will note that it is a lot more convenient connecting a SD card adapter directly to the BBC Micro’s user port and adding something like an MMFS ROM)