So I bought the motherboard out of an Amstrad CPC-464. This was like my Oric Atmos rationalisation . It’s cheaper to just buy the motherboard of some of these old computers, rather than the whole computer (especially when I add in postage from the UK to NZ). And I am more into these old computers for my own curiousity and educational value, rather than just purely ‘collecting them’. In the case of the Oric, I came up with a Arduino based ‘PS2 keyboard to old-school key matrix’ converter to get around ‘not having a keyboard’. I was thinking of doing the same for the Amstrad, but I had a nice Cherry keyboard that I was given for free; ie. individual keyswitches and an easy single sided PCB. So I butchered it to turn it into an Amstrad keypad (well most of it).
Yeah, I hate butchering things too … but it was gathering dust. Anyway, the CPC 464 service manual has the matrix for the 464 on p11.
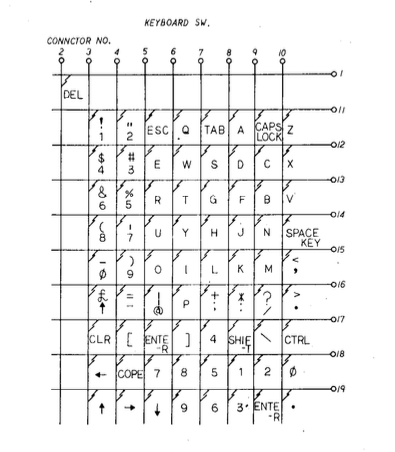
It was nothing like the existing wiring on the Cherry, so I initially cut every single PCB trace to a keyswitch, then ran a lot of wire wrap wires to make up the 464 matrix. Here’s the result
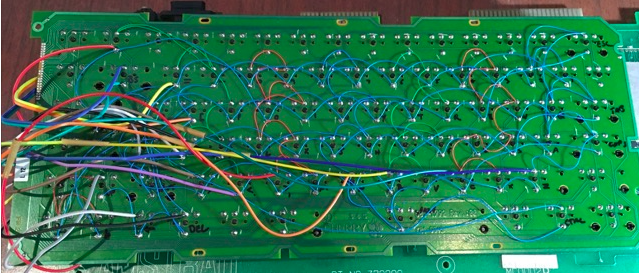
The Z70200 CPC 464 board I have has two connectors for the keyboard. One is a single row of 20 pins with 0.1″ spacing. But there are also two flex cable sockets which the original keyboard would have used. I soldered a pin header into the 20 pins, and then ran 19 (one pin is not used) jumper wires to plug into it.
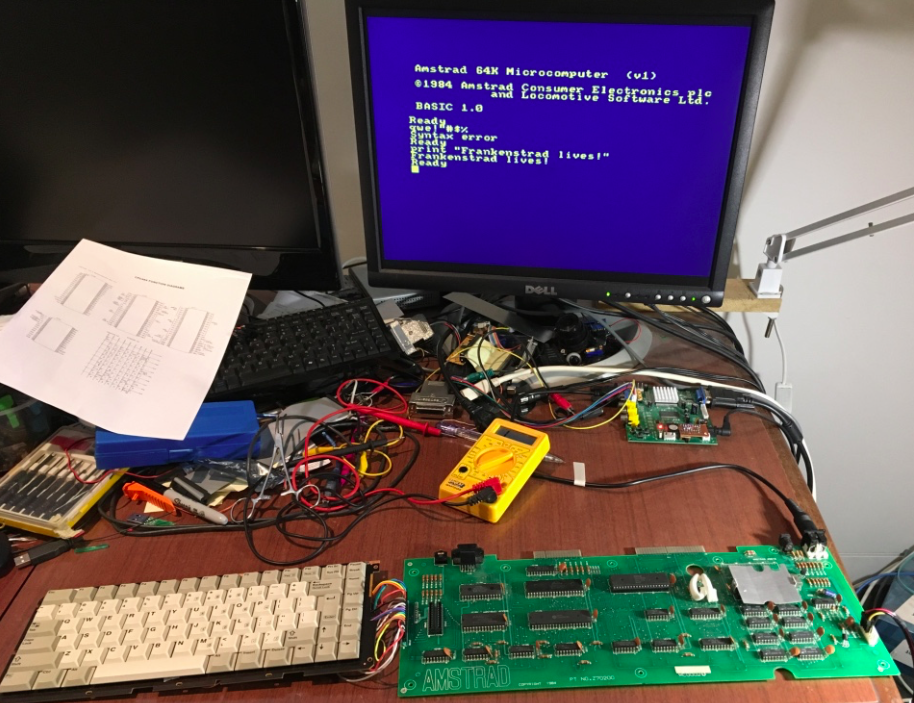
So I had a keyboard wired in. What about power and video output? I used a cheap LM2596 PSU (off ebay) and a 2.5A 12V DC plugpack to supply 5V, and connected it in on the right of the board via the cassette connector (CP001). For video, the 464 has a DIN socket on the back that pumps out RGB and sync. This is 15KHz/50Hz style RGB, so I just created a straight through cable from the DIN to a VGA plug, then plugged this into the input of my Gonbes (which has an ATTiny85 hooked up as per here ). And I powered on, and all was good (well I had one or two mistakes in my keyboard wiring, but after I fixed those then it was all good);
What about loading stuff? The 464 had a built in cassette recorder. I did not have the cassette unit at all. There’s a few links online about how to run an audio AUX-IN input in your 464. Most seemed to run wires directly in to spots on the circuit board that is part of the cassette player mechanism. I did not have the cassette player at all. If you look at the cassette connector on the main motherboard, the cassette read/write connect directly to the 8255 IO chip with no buffering/amplification.
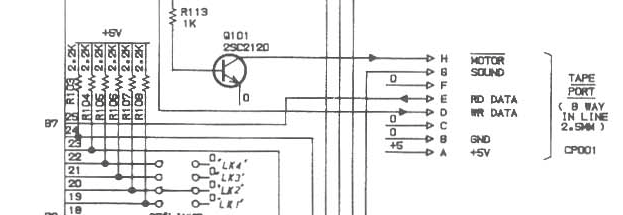
I will also note here that there are a few different versions of the above. Maybe there are a few board designs. My Z70200 board matches the above. But the actual service manual seems to have a slightly different diagram with GND and +5V on different pins. ‘RD DATA’ is what we’re interested in so far as cassette loading.
I tried a few different simple transistor amp circuits, but ended up with the following

The LED attached to the motor control is so that you can see when the Amstrad (thinks it) has activated the cassette motor. For most games I found the motor LED is on continuously while loading, but there are a few that you’ll need to pause the audio when the LED goes off temporarily.
And now I can enter
run””
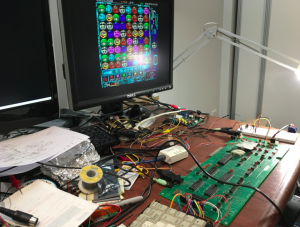
and load a game into the thing. Here it is running ‘Betiled’
I am new to Amstrad-land (I had never used one before, nor tried an emulator!), so I had to figure out how to load cassette images. For me this was;
- Download playtzx 0.12c for linux from the worldofspectrum utilities page
- Compile playtzx on linux. I was worried it wouldn’t work (as its pretty old). It compiled OK on my Fedora 24 box.
- Find some source of Amstrad cdt files (I’ve been using cpc-power)
- Convert cdt files to voc files./playtzx -voc -freq 22050 some-game.cdt some-game.voc
- Run a 3.5mm stereo audio cable from your linux box audio out to the cassette input transistor buffer bit (ie. the little transistor amp thing I showed earlier). Turn the volume right up (I just use alsamixer). After you do the RUN”” on the Amstrad and hit ENTER a few times, do this on your linux boxmplayer some-game.voc
- Patiently wait. I find these cdt images often have ‘nothing’ at the start of them, and you don’t get any indication the Amstrad is doing anything until about 20 seconds (or even close to 40 seconds) into loading. Some games take a long time to load, and I’ve noticed an oddity where it looks like its not loading towards the end of playing the image (via mplayer) … but if I just wait until mplayer finishes playing , it turns out that the game actually starts (Ninja Scooter Simulator is like this for me). Also watch out for games where the motor LED goes off. You’ll need to hit the space bar on your mplayer session to pause it until the LED comes back on again.
So what’s an Amstrad CPC 464 like? I wasn’t expecting much. It has no hardware sprites, no proper hardware scrolling (other than what is possible with the 6845), and I know what you can generally get out of an AY chip for sound is just ‘OK’. But I am quite impressed. The games are quite colourful, and the music and sound effects not too bad. My son and I have been playing Ghostbusters a fair bit, and we have also played the C64 version as well. The C64 version is better, but not by much. Playability-wise the Amstrad version is really good. The Dizzy games are good (I think they originated on the Amstrad), and something like Rick Dangerous is fun and humerous (and I have only played the Amiga version). There were an enormous number of games written for the Amstrad. It was a lot more popular than I thought.