So I’ve been busy lately making some homebrew microprocessor systems. When you make a system from scratch you have to figure out how to get it to boot some code. There is no built in flash or ISP mode in these old school microprocessors, so you need to figure out how to get some code and a RESET vector into some kind of ROM. There are lots of different approaches to this problem. I think you end up using what suits you based on the tools/chips you have available.
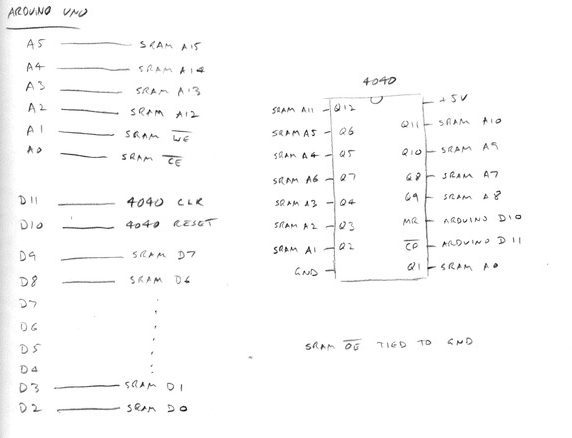
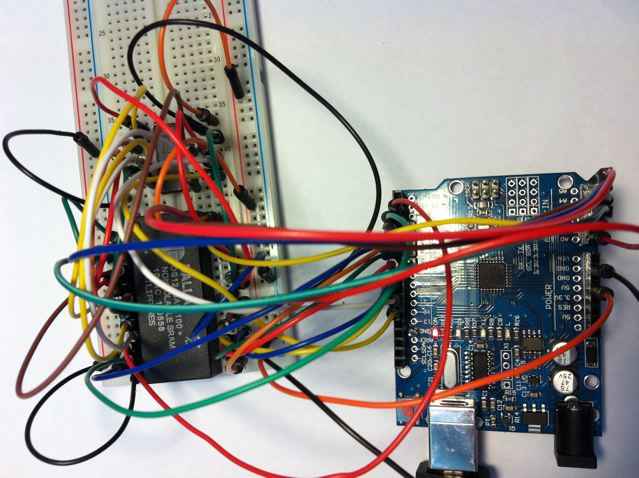
One approach I’ve been using lately is to program a battery backed static RAM (one of the Dallas Semi chips. Mine is a 128Kx8 DS1245AB) on a breadboard and transfer it to a target system. I ended up just hacking the Arduino meeprommer code so that it used a 4040 counter instead of the two 74HC595 registers, and instead of needing a dedicated client programmer, I’ve added in simple XMODEM transfers so that I can use minicom (in linux) to transfer the binary content to the SRAM.
The wiring is pretty straight forward. It should be able to write up to 32K of data (so for me with my 128KB SRAM, I just need to tie the high address lines high or low to load 32K at a time). You should be able to use most of the common old school SRAMs; 6116, 6264, 62256 etc.
 The Arduino sketch is here.
I had a heap of trouble getting the xmodem serial buffering working with the Arduino and to resolve it I just changed the Arduino IDE hardware config to use 256byte serial buffers (instead of 128byte). There are some (older) details on the hobbytronics site how to do this. I think the details have changed slightly for the newer Arduino IDEs but you should be able to figure it out.
Basically, load the sketch then shut down the Arduino IDE and fire up a serial terminal like minicom. Use 115200 8N1 and hit ENTER a few times. You should get a ‘%’ prompt.
Hitting ‘v’ should print out some version info.
You can read from the attached SRAM with r XXXX YYYY where XXXX is the start hex address into the SRAM and YYYY is how many bytes to show on screen. eg
% r 0000 0080

0x0000 : C0 00 00 2F 00 C2 80 80 00 FA C0 00 40 00 E5 C1
0x0010 : 80 28 00 E5 C3 90 08 00 0E C3 00 40 00 F0 D7 00
0x0020 : 0C 00 08 D7 20 08 00 FF 00 F0 0D 20 47 B9 20 34
...
0x0070 : 20 A3 B7 A9 20 A2 C3 20 1F FE 4C 5C B2 A5 3B F0
The main other command is w XXXX which will write to the SRAM at hex offset XXXX using an XMODEM transfer. For me using minicom, this is something like
% w 0000
Please start an xmodem transfer in your terminal ...
C
Then ctrl-a s , choose XMODEM and then choose a file to transfer and it should chug away for a little bit transferring some data. I think it should be good for ‘up to 32K transfers’. You can double check everything transferred by using the ‘r’ command again to read the SRAM.
Once you have it programmed, I just power it down, pop out the battery backed SRAM and transfer it to the target system. If you don’t have a battery backed SRAM, you can solder some pullup resistors (eg 4k7’s) directly to your SRAM and some long wires to GND and +5 on the SRAM. I use two pullups. One from WE* to +5, and another from CE* to +5. Then have a long wire from GND on the SRAM to GND on your target system (making sure that the GND of your target system and your arduino are tied together), then the other long wire is from the SRAM +5 to +5 in your target system. Make sure the +5 of your Arduino and the +5 of your target system are NOT connected together (also, the +5 Vcc pin of your SRAM should only go to one +5V source). You will have wires dangling all over the place and you will need to be very careful you don’t short anything when levering the chip out, but it does the job.