So as well as my C128, I recently picked up an Acorn RiscPC. This is my first Acorn ARM machine (I’m politely ignoring all the phones and other modern ARM chip licensed devices everyone typically has). I’d been on the lookout for an old A3000, but they are so rare these days. But the RiscPC is somewhat further along in the evolution of Acorn ARM based home computers …. and is very high spec compared to many of the other machines in my menagerie. It came with a StrongARM CPU, 256MB of RAM, 5×86 card, CDROM and ethernet. In many ways it takes advantage of the technology available in PCs of the time (full IDE for disk drive and CDROM).
Anyway, I’ve only just started to play with it, and first thing I noticed is that the mouse is a bit crappy. Its an old ball mouse. I have had plenty of saga’s with old ball mice in Amigas and Ataris … and sometimes you can clean them up and they work fine. Other times they are a bit too ‘gunged up’ … and I end up using a homemade PS2 to quadrature adapter and an old PS2 ball mouse. That works great on an Amiga or an Atari (with slight mods).
Anyway, I knew nothing about RiscPC mice. It has a mini 9 pin DIN connector … so I started to do the obligatory googling to figure out what those 9 pins do. It turns out that it is quadrature style mouse just like the Amiga and Atari. I was thinking of hacking my PS2/quadrature adapter when I came across this article about converting a PS2 optical mouse for use on an Acorn ARM system.
In that article it was observed that some (PS2?) optical mice contain two chips; one that does the optical stuff and actually has output pins for the quadrature information and two a chip that converts to the PS2 protocol. Now I had a PS2 optical mouse that had sat in the cupboard for years (a Genius GM-04011P). It had never seemed to work with my PS2/quadrature adapter, but I thought I’d open it up to see if it had one of these optical chips that do the quadrature stuff. Indeed it did. It contained a different chip to the article. Mine had a PAN301ASI-204 chip, but the important thing is that it had output pins for Xa, Xb, Ya and Yb (the quadrature outputs).
So I pulled apart the Acorn mouse I had (Logitech M-PH15). The mouse cord that comes into the mouse terminates in a 10 pin socket header that I could remove. The idea was to use the cord from the Acorn mouse, attach a 10 pin header to it, then solder to the appropriate points
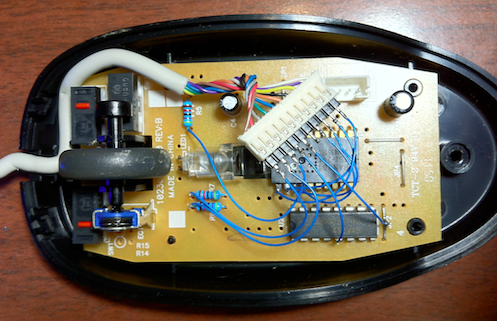
 My mouse conveniently had spots to put pullup resistors. I put in 47K’s. So in the photo I’ve attached wire wrap wires to the non-5V ends of the pullups and the 4 wires in the lower part of the picture are connected directly to the optical chip. The chip is upside down in the photo. The upper of the 4 wires is p11 (Ya), next is p12 (Yb), next is p13 (Xa) and finally p14 (Xb). There are two more wires required to get +5 and GND from somewhere.
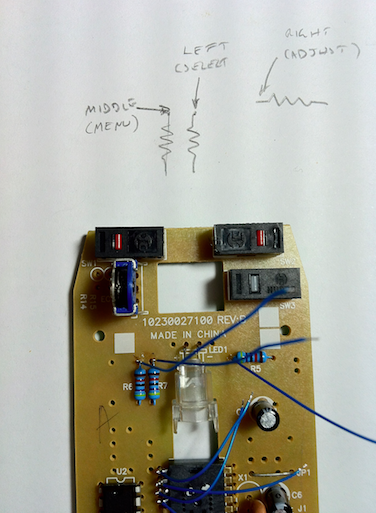
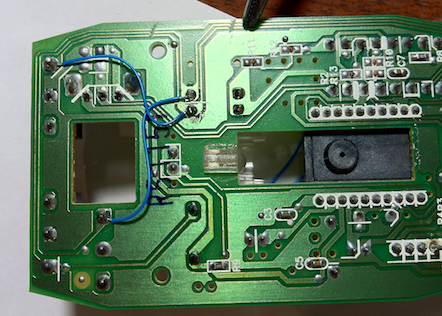
The next photo is the underside. I initially cut the tracks to the 3 microswitches in the wrong spot to take advantage of the 3 spots on the circuit board to put pullups. So I cut the tracks again (next to the forceps in the top middle of the photo), and then had to run those two wire wrap wires below to connect over my initial cut.
So this is how I ended up wiring up to the 10 pin header (note it is a 2mm spacing header, not a 2.54mm spaced header).
- Brown – Select (left) button
- Red – Menu (middle) button
- Grey – Adjust (right) button
- Green – +5V
- Blue – GND
- Orange – ??
- Black – Xb
- Yellow – Xa
- Purple – Yb
- White – Ya
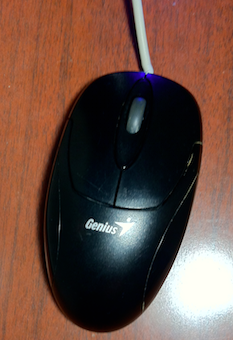
And here is the typical mess and the completed mouse. I should probably put some tape around the header bit to prevent shorts. But it works really well. I actually tested it on an Amiga before connecting it to the RiscPC … and it worked really well on the Amiga too.