Ages ago I read this shmups post about hooking up a Raspberry Pi to an GBS-8200 to ‘get better control of the Gonbes’. I remember trying it. Had a bunch of problems … kind of got it working .. . and kinda concluded it was too much hassle, but had enormous potential. To me the Gonbes is ‘90% of the way there’ for doing the 15KHz/50Hz RGB modes the Amigas and Atari St put out. Sure it connects and shows an image, but like a lot of people I get random noise in the image and there’s some weird artifacting that goes on …. but its really good value for money. The shmups project added in some ‘non scaled modes’ which to me would give you a very high quality display out of an Amiga or ST … so long as your VGA monitor could Vsync down to 50Hz (as I live in the PAL part of the world). At the time I did not have such a monitor. Of course, after getting a Gonbes I kept on searching for the ultimate retro monitor and ended up with a pre June 2005 Dell 2001FP. Pity they are now all over 10 yrs old.
The 2001FP is still brilliant.
But I was looking at that shmups thread more recently and there was a port of the rPi code to a DigiSpark Arduino device. There’s also mention in the thread of someone getting it going on an Arduino Uno. I had always thought ‘waiting for the rPi to boot’ just to display a picture on a monitor was a bit nuts.
So I thought I’d have another look at this shmups setup using an Arduino Uno. Another motivation is that I’ve recently acquired an old Viewsonic VX2235 monitor. It came ‘thrown in’ with another old computer I bought and I was curious about whether it could sync down to 50Hz for VGA modes. If you poke around Amiga forums, there are various mentions of some Viewsonic monitors supporting 50Hz (for reference, the base VGA resolution of 640×480 has a Vsync of 60Hz. 640×480 @ 50Hz is not officially a supported VGA resolution so most monitors will either tell you to bugger off, or show a stupid floating message telling you that the mode is not supported while actually perfectly displaying the mode in the background!)
So the VX2235 does support 50Hz vertical sync. I crossed my fingers that it might also support horizontal sync down to 15KHz … but I was being too wishful. It does not. So it will do roughly 31KHz Hsync and down to 50Hz Vsync. That of course, is what you need to be able to display these ‘non scaled PAL modes’ with the shmups project.
So I downloaded mybook4’s DigiSpark project from github, pulled out the GBS_Control folder and made the few pin changes noted in the shmups thread. There’s a note that using A4 and A5 for the SDA and SCL stuff did not work. I just used D3 and D4 ;
#define DDR_I2CBB DDRD
#define PORT_I2CBB PORTD
#define PIN_I2CBB PIND
#define SDA_BIT 3
#define SCL_BIT 4
Got the sketch to compile and uploaded it. The notes in the thread indicate a ‘resolution toggle switch’ hooked up that can switch between two core modes; 240p and 480i. There’s also a lot of stuff to do with a remote control interface. I didn’t have the remote control in question, and was only really interested in one or two modes, so was hoping it would just boot up in one of these modes. The code seems to auto boot into the 480i mode (as at April 2016)
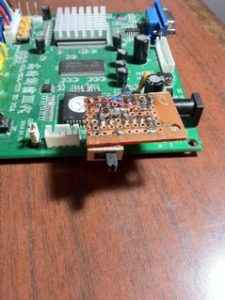
Anyway, I programmed the Arduino, hooked up D3 and D4 to the SDA and SCL pins of the Gonbes, shorted the P8 jumper, tied GND to the Arduino (which is initially powered via USB). And hooked it up to my Amiga 600. And cool! I had a picture. But it was 60Hz (I mean the monitor was getting a 60Hz signal). Doh! I should have realised 240p and 480i were going to be NTSC style 60Hz modes.
Anyway, if you poke around the original rPi code, you’ll find all the gbs control ‘settings’ files. For PAL land, the two that I was interested in were;
RGBHV_720x576@50Hz_RGB_288p50_No_Scaling.set
RGBHV_720x576@50Hz_RGB_576i50_No_Scaling.set
These are just a list of numbers. If you look at the ProgramArray240p.h and ProgramArray480i.h files from the Digispark project you’ll see these are effectively the same sort of lists of numbers. So I just created a ProgramArray288p50.h and ProgramArray576i50.h file and filled them with the numbers (comma separated) from the rPi project ‘set’ files.
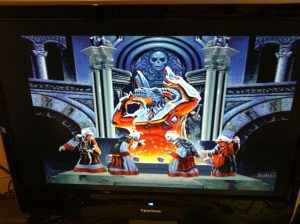
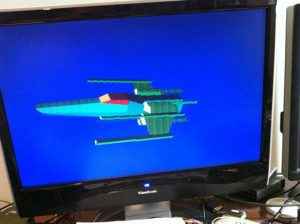
A bit more hacking of the source code later and realising that I think the resolution switch stuff was completely disabled anyway, and I had it so I could switch between 288p @50Hz and 576i @ 50Hz. 288p is fine for most Amiga stuff unless it tries to put an interlace image up, in which case it looks a bit weird. 576i get’s rid of that weirdness and generally looks pretty good overall.
Having said that I have noticed in 576i mode there is a visual distortion around the mouse pointer as you move it (eg. in Workbench), but this visual distortion does not occur in 288p mode.
So below is just mybook4’s code with mods to have the switch between 288p (HIGH) and 576i (LOW) using a switch on D2. SDA is D3, SCL is D4.
GBS_Control_ArduinoUno-0.02.tar.gz
Here’s a few pics.
UPDATE: What about using an ATTINY85 instead?
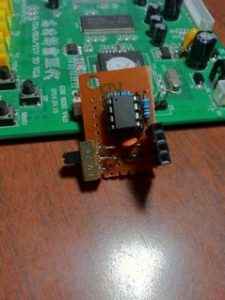
I guess ‘hanging an Uno’ off the Gonbes is a bit inelegant. I was considering using an Arduino Mini instead, when I wondered whether this code would fit into a ATTINY85 natively. The 85 is a 8 pin DIP so could almost be soldered directly in.
So what I’ve done is to hack and slash the code a bit to make it compile with avr-g++ (ie. not the Arduino IDE), and then use avrdude to flash it natively onto a ATTINY85. Essentially the code ‘just fits’ so long as you are happy with just being able to switch between the 288p and 576i no scaling modes (it would be quite easy to hack in some other modes so long as you dont mind just having two modes).
Initially I tried the code using an external 16MHz crystal (on p2 and p3). This worked fine (even powered at 3.3V off the Gonbes). But I’ve redone the fuses to use the internal 8MHz oscillator (and updated config.h to reflect this). While Atmel insists this is not very accurate … it seems accurate enough for this use case.
So the Gonbes P5 connector has Vcc (3.3V), GND and SDA and SCL. Wire Vcc and GND to the ATTINY85, and SDA goes to p6 (PB1) and SCL to p7 (PB2). The switch is wired to p5 (PB0). Or alternately you can have a 4k7 pullup on PB0 and then just short it to GND to select the other mode. The other thing is put a 4k7 pullup on p1 (RESET*). Don’t forget to short P8 on the Gonbes.
# compile it
./make.sh
…
text data bss dec hex filename
0 8088 0 8088 1f98 GBS_Control.hex
# Hook up an ISP (I used an Uno as ISP). Check you can talk to the attiny85
avrdude -P /dev/ttyUSB0 -b 19200 -c avrisp -p attiny85 -v
# Program it and set appropriate fuse bits
./prog-attiny85-int8mhz.sh
GBS_Control-attiny85-0.01.tar.gz