So I had an Amiga 500 in my late teens/early twenties. I had the 512K RAM expansion (actually a home brew one) and one external floppy drive. I wrote a heap of 68000 assembly back then using that setup. Hard drives were around but they were the ‘stuff of dreams’. They were so so expensive back then that you didn’t even consider that you could actually afford one.
Fast forward 30 years and I have an Amiga 600 and two Amiga 1200s. They all have internal Compact Flash hard drives and are really a lot easier to use with a Hard Drive. And you can run WHDLoad which is a really amazing piece of software and community effort. I still have my original Amiga 500 as well as two others (one converted to an Amiga 500++). I’ve always thought it’d be nice to have a simple/cheap hard drive for the 500s. There’s been a few internal IDE projects and the sort over the years, but I was poking around github and came across sdbox . It appears to be pretty new and is exactly the kind of cheap simple hard drive I was looking for. Huge thanks to Jorgen for posting the project.
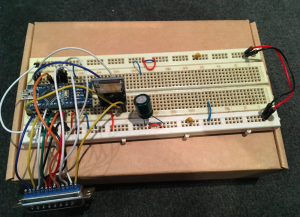
Essentially, sdbox is an Arduino Nano, a micro SD card adapter and a DB25 plug to connect to the Amiga parallel port. It was very easy to put together. In about 15 mins I had this breadboard setup ready to go:
For sdbox to work you need to flash the arduino with some firmware, then get the spisd.device driver in DEVS: on the A500 and then you can partition and mount the microSD card as a hard disk. The obvious caveat here is that you still need to boot the A500 from floppy. But you really only need enough on the floppy to mount the hard drive and then run an alternate startup sequence that assigns lots of stuff to your hard drive (eg. assign DEVS: dh0:devs, assign c: dh0:c …)
I wanted what looked like a regular hard drive for an Amiga (ie. boot to Workbench etc). I ended up reading this Formatting an IDE drive for use in an Amiga 500 page. It describes the process for setting up a DIY internal IDE adapter for the A500 which uses a device driver ide.device to drive that adapter. I put spisd.device in the devs: directory of the IDE-Setup.adf floppy on that page and pretty much followed most of the instructions replacing ide.device with spisd.device instead. I ended up using the same params mentioned for a 128MB CF card , but on a 16GB micro SD. That gave me just two 65MB RDB partitions. Working out the cylinders, surfaces, BlocksPerTrack etc is a bit of a mystical art. I’d suggest just having a play. In my case I ended up upping the number cylinders substantially, but still trying to keep actual partition sizes quite small (like 100MB for the first partition, 200MB for the second …). In my case I edited the ‘Information’ tool types for the HDToolbox so that SCSI_DEVICE_NAME=spisd.device, then it recognised the SD card. and let me format it later (though I had to use the ‘quick’ option to the AmigaDOS format command). I copied some files around and confirmed that the SD card interface does work like its supposed to work.
But I had a plan. My Amiga 500++ has 2MB of RAM (1MB in the trapdoor). 2MB anecdotally seemed to be the bare minimum to be able to use WHDLoad. I put the Kickstart 2.05 I had from my Amiga 600 into the A500++ . Next I took the already partitioned micro SD card (with RDB partitions) and attached it to a linux system with FS-UAE (I used Fedora 32 on my laptop). There are probably several sites describing the technique, but basically you use FS-UAE to install Workbench 3.1 to the SD card. First create an Amiga 500+ based configuration (eg. 2MB ram, and KS 2.05 in my case), load all six Workbench 3.1 floppy images and save the config and exit FS-UAE. Then you go and manually edit the FS-UAE config for what you just saved. Plug the microSD in and work out what device it is (I just ‘cat /proc/partitions’). In theory it should not mount with a RDB partition scheme (make sure you sudo umount if you do have some linux automounting setup). Here’s what I added to the config file
hard_drive_0 = /dev/mmcblk0
hard_drive_0_type = rdb
You might need to sudo chmod 666 the hard drive device file , then run FS_UAE again and you should see your hard disk configuration. Load the 1st of the Workbench install disks and reboot off it. You’ll then need to put in the other 5 disks as necessary to install Workbench 3.1. Once its complete you should be able to shut down FS-UAE and move the sdcard to the sdbox adapter and start the Amiga 500++. I just followed the instructions on the Formatting an IDE drive for use in an Amiga 500 page so far as renaming the startup-sequence files in order to get it to boot the hard drive. And it did boot just fine.
Next step is to install WHDLoad. Again, I put the SD card back into my linux system, booted it with it with no floppy drives inserted and it appears to boot off the SD card. Then I create a ‘folder based hard drive’ in FS-UAE called localhd: . I put the WHDLoad_usr_small.lha installable, grabbed the self extracted http://aminet.net/package/util/arc/lha , and also grabbed the Installer 43_3. You can either boot the virtual Amiga, run the lha.run , then run lha_68k x <file> to extract WHDLoad and the Installer, or faster is to use ‘7z x <file>’ under linux in the directory for localhd. Anyway, with the virtual Amiga booted, you need to copy the file called Installer from the localhd: to c: on the SD card based hard drive, then you should be able to double click the WHDLoad installer and have it install to the SD card based hard drive.
So now I had a setup where I could boot the special boot floppy and end up in a Workbench 3.1 running off the sdbox hard drive. I could also load up some WHDLoad’d games off the hard drive. For the ones that I tried they seem a little slow to start, and the title screens can often flicker badly (which I understand is do with the lack of RAM when you can’t use PRELOAD), but the games start and work just fine. Awesome. Later, I altered my startup sequence so Workbench no longer loads and instead you get dropped to a CLI prompt That gives you a bit more RAM, and I just used WHDAutoload to launch games. That gives you more free RAM, and some games seem to load a bit more smoothly.
I also went back and dug my old Rev 5 Amiga 500 out of the cupboard. It has 512K chip, plus 1.5MB slow on one of the A500 open source trapdoor expansion boards (with Gary adapter). It too could boot and mount the sdbox partitions just fine. I have switchable kickstarts in this A500, and I could boot Kickstart 1.3 or 3.1 and it all worked fine (though I made it exit to the command prompt for a 1.3 boot). I also discovered jst , which is a really cool piece of software that allows you to run WHDLoad slave files from the command line , even on a 1.3 Kickstart.
One thing I struggled with is the memory use when you mount a partition. I found that a very large partition tended to hog a lot more RAM out of your 2MB then a smaller partition. I’d probably keep your partitions under 200MB or so if you want lots of free RAM. I was also pleasantly surprised that modern day linux (in my case Fedora 32) recognises the RDB partition format automatically. So if I had one partition as a FAT32 one, then it was very easy to mount it on a linux system.